RS320
Spring Reverb
INTRODUCTION
Reverberation is a phenomenon quite distinct from echo. Whereas the latter may involve at most a handful of repeats per second, a convincing reverb requires thousands per second. Furthermore, these must not be regularly spaced, or an unpleasant "ringing" sound will result. This means that conventional analogue delay lines are quite unsuitable for creating reverberant effects. A multi-tapped BBD such as the RS310 can go some way to overcoming this, but even this is incapable of creating realistic reverbs because it lacks the sophisticated filtering and decay characteristics required.
Until the introduction of affordable digital signal processors, studios used three methods to create reverberation. The first was to place a speaker and one or more microphones in a 'live" room that possessed pleasing natural reverberation. The second was to use a reverb "plate", a device that uses transducers to excite - and then pick up the resulting vibrations within - a large, heavy metal plate. The third is a cheaper version of the plate. It is the "spring" reverb.
Of these, the live room (of course) produces the most authentic reverb. A good quality plate is also very pleasing, but this is due less to the authenticity of the reverb than to the tonal quality it imparts. In contrast, the sound generated by a spring is far from authentic, and it has proved unsuitable for many natural sounds. Pass vocals, acoustic guitar, or percussion through a spring reverb, and it simply goes "boinggg". Nevertheless, spring reverbs are far from useless. Many guitar amplifiers incorporate them, as do a handful of synthesisers such as the ARP2600. The presence of these springs allows you to create sounds that would be impossible without them, so you should approach the RS320 as another signal "modifier" - a module that allows you to generate new and often strange sounds, rather than one that simply attempts to imitate a natural effect. Furthermore, you can place the reverb within the signal chain of your synthesiser, thus using it as part of the signal generation itself.
INSTALLATION
The RS320 comes in two parts: the front-panel module, and the spring/mounting tray itself. If these are not pre-mounted in an Integrator case, you will need to install them yourself.
Firstly, you should inspect the plastic tray to ensure that it is completely flat, and that the spring unit floats freely on its four mounting springs. If everything is in order, you must decide where you wish to mount the unit inside your Integrator. Choose a suitable flat surface such as the inside of an RS15's side or rear plates, and make sure that you avoid obstructions like the power supply.
If you inspect the tray closely you will see that it has two small clips - one at either end. These are not designed for use with the Integrator, and you should remove them using a suitable tool such as a pair of side-cutters.
You should now make sure that you can stick the entire length of the tray to the chosen mounting point, and that the transducer assemblies do not touch any part of the Integrator. Remove the protective strip from the sticky pad on the rear of the tray, and attach it to the inside of the Integrator. Press the tray firmly into place, but be careful not to apply pressure to the spring assembly itself. Screw holes are also provided so that users with wooden cases can mount the unit securely.
WARNING: PERFORM THE NEXT STEPS ONLY WITH THE MAINS POWER REMOVED FROM THE INTEGRATOR. FAILURE TO DO SO RISKS DAMAGE TO THE SYNTHESISER, AND MAY LEAD TO ELECTROCUTION.
Choose a suitable location for the RS320 front panel, and connect the power supply ribbon cable to a free socket on the psu. Ensure that the red stripe on the cable is connected to the RS320's power socket where it says "STRIPE", and that you connect it to the integrator psu on the upper (0V) pins. Failure to do so may damage both the integrator and the RS320 when you switch on the mains power.
Note: The geometry of the RS320 is such that the power cable may "feel" natural the other way up. Do not let this confuse you.
Connect the spring unit's audio cables to the pins on the RS320. The green/black twisted pair carries the source signal (it passes through the "IN" clip on the tray) and you must connect this to the "TO" socket on the RS320 board. The red/black twisted pair carries the effected signal (it passes through the "OUT' clip on the tray) and you should connect this to the "FROM" socket on the board. In both cases, the orientation of the cable colours is marked clearly, and you must ensure that you connect the cables correctly.
You may now screw the RS320 panel into the integrator, reconnect the mains power, and switch on.
IN USE
The RS320 is a 16Omm (approximately 6") dual-spring reverb unit similar to those found in guitar amplifiers. It has a maximum reverb time of about 4 seconds.
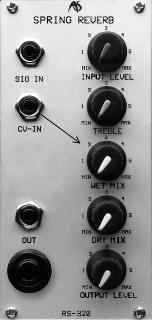
SIG IN, INPUT LEVEL, OUT, OUTPUT LEVEL
The RS320 has one audio signal input, SIG IN, with an associated INPUT LEVEL control. This accepts signals in the range +-10V.
There are a pair of outputs - a 3.5mm mini-jack socket and a ¼" jack socket for direct connection to an external amplifier or mixer. These carry identical signals in the range +-10V. An OUTPUT LEVEL control allows you to determine the amplitude of the output signal.
WET MIX and DRY MIX
These controls allow you to mix the wet and dry signals in the desired proportions. When either control is in its fully anticlockwise position, that signal will be fully attenuated.
CV IN VARY
The CV IN input allows you to modulate the WET MIX by applying a CV in the range +-10V.
TREBLE You can modify the tone of the signal by adjusting the TREBLE control. This is a mild low-pass filter at the spring input that helps to "darken" the reverb, much as furnishings or curtains would soften natural reverberation in a room or hall.